
What Is Progressive Die Stamping? A Complete Guide
In the world of high-volume manufacturing, the goal is to produce millions of identical parts with incredible speed, precision, and the lowest possible cost per part. For creating small, complex metal components, one manufacturing process stands above all others in achieving this goal: progressive die stamping. It is a marvel of mechanical engineering. This technology is the unseen force behind countless everyday items, from the connectors in your phone to the brackets in your car.
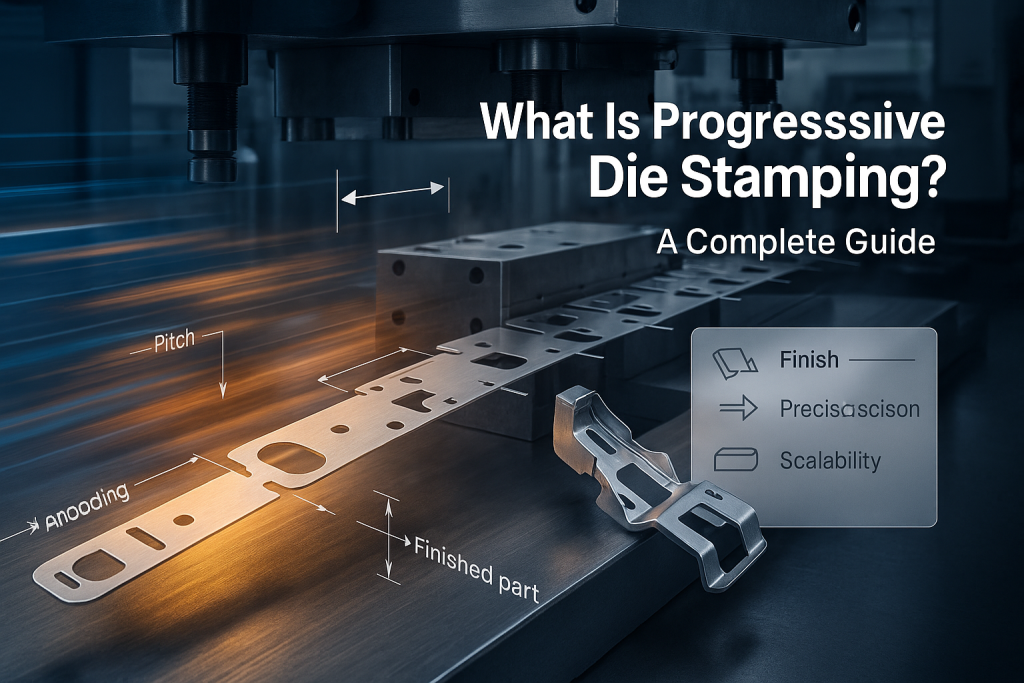
Progressive die stamping is a high-speed metal forming process that uses a single, multi-station tool (a "die") to perform a series of simultaneous operations on a coil of sheet metal. The metal strip, known as a carrier strip, "progresses" through the die. Each station in the die performs a specific cut, punch, or bend. This continues until a finished part is created with every single stroke of the press.
As an expert in high-volume sheet metal manufacturing, GD-Prototyping specializes in the design, construction, and operation of complex progressive stamping tools. This guide provides a deep, technical dive into this powerful technology. We will explain how it works, detail the intricacies of the tooling, and explore the benefits and applications that make it an essential process for modern mass production.
The Progressive Die Stamping Process: A Detailed Explainer
The magic of progressive die stamping is its ability to transform a simple, flat coil of metal into a complex, three-dimensional part in a fraction of a second. This is achieved through a perfectly synchronized sequence of events. Understanding this sequence is key to appreciating the technology's power and complexity.
The Setup: The Press and the Die
The process takes place on a high-speed mechanical or servo press. This powerful machine provides the vertical motion (the "stroke") that drives the process. The heart of the operation is the progressive die itself. This is not a simple tool; it is a massive, custom-built block of steel. It contains all of the individual punches, forms, and cutting stations required to make the part. The die is composed of two halves: an upper die that moves with the press ram, and a lower die that is fixed to the press bed.
Step 1: Feeding the Carrier Strip
The process begins with the raw material. A large coil of sheet metal, which can be hundreds of feet long, is loaded onto an uncoiler. The end of the coil is fed through a straightener and then into the progressive die. This continuous ribbon of metal is known as the carrier strip. It is the vehicle that will carry the part through its entire transformation.
Step 2: The First Stroke - Multiple Operations
With the strip in position, the press begins its cycle. On the very first stroke, each station in the die performs its specific operation simultaneously on a different section of the strip.
- Station 1 might pierce a series of small, precise "pilot" holes. These holes are critical for accurately locating the strip in the subsequent stations.
- Station 2 might perform a cutting or notching operation to begin defining the outer profile of the part.
- Station 3 might punch out an internal hole or slot.
- Station 4 might perform the first bending or forming operation.
This simultaneous action is a core principle of the process.
Step 3: Progression of the Strip
After the first stroke, the press retracts. A precision feeding mechanism then advances the carrier strip forward by a single, exact distance. This distance is known as the "pitch." This movement places the section of the strip that was just at Station 1 into perfect alignment with Station 2. The section from Station 2 moves to Station 3, and so on. A fresh section of the coil enters Station 1.
Step 4: The Second Stroke and Beyond
The press then performs its second stroke. Now, the magic of the "progressive" process becomes clear.
- The fresh material at Station 1 is pierced with pilot holes.
- The first part, now at Station 2, is notched.
- The part that was notched, now at Station 3, has its internal hole punched.
- This continues down the entire length of the die.
With every single stroke of the press, each part on the strip is advanced to the next station and undergoes its next transformation. The part is progressively formed as it moves through the die.
Step 5: Ejection of the Finished Part
At the very last station in the die, a final "cutoff" or "blanking" operation takes place. This station cuts the fully formed, completed part away from the carrier strip. The part is then ejected from the die, often falling onto a conveyor belt to be collected. The remaining carrier strip, which now looks like a ribbon of metal with part-shaped holes in it, is chopped into scrap for recycling.
The result of this continuous, synchronized dance is an incredible rate of production. After the initial setup strokes, a complete, finished part is produced with every single stroke of the press.
The Heart of the Process: The Progressive Die Tool
The finished part can only be as good as the tool that makes it. A progressive die is one of the most complex and expensive pieces of tooling in all of manufacturing. Its design and construction require an immense amount of skill and precision. It is a capital investment that can cost tens or even hundreds of thousands of dollars.
What Makes a Progressive Die So Complex?
The Die Set The foundation of the tool is the die set. This consists of a thick, heavy upper and lower plate, called die shoes, made of high-grade steel. These shoes are precisely aligned by large guide pins and bushings. This robust structure ensures that the upper and lower halves of the tool align perfectly with every stroke, which is essential for maintaining tight tolerances.
The Stations Mounted within the die set are the individual stations. Each station is a custom-designed sub-assembly of punches, dies, forms, and other components. These are typically made from extremely hard and wear-resistant tool steels. Each station must be perfectly located relative to the others to ensure that the features created at one station align with the features created at the next.
The Carrier Strip Design A significant part of the engineering process is designing the carrier strip itself. The engineer must carefully plan the sequence of operations. They must design the strip to be strong enough to carry the part from station to station without stretching or deforming. They also work to orient the parts on the strip in a way that minimizes material waste. This is called "nesting."
Sensors and Automation Modern progressive dies are often equipped with a sophisticated network of electronic sensors. These sensors can detect if the strip has fed correctly, if a punch has broken, or if a finished part has failed to eject. If any error is detected, the sensor can instantly stop the press. This prevents a catastrophic and extremely expensive crash of the tool.
Key Advantages of Progressive Die Stamping
The high upfront cost of a progressive die is justified by the immense benefits it provides in a high-volume production environment.
Incredible Speed and High Volume
This is the primary advantage. A high-speed stamping press can run at rates from 60 to over 1,500 strokes per minute. Since a finished part is produced with every stroke, this translates to an astonishing production rate. This speed is unmatched by any other metal forming process for small, complex parts.
Extremely Low Per-Part Cost
Once the initial, significant investment in the die is made, the cost to produce each individual part is extremely low. The process is fully automated. The raw material is purchased in efficient, large coils. The labor required is minimal. This results in a per-part cost that can be fractions of a cent, which is essential for industries like automotive and electronics.
High Repeatability and Consistency
The process is exceptionally stable. The die is a fixed, unchanging tool. This ensures that the millionth part produced is dimensionally identical to the first part. The tight tolerances and high repeatability are critical for components that will be used in automated assembly lines.
Reduced Material Waste
The design of the carrier strip is a careful exercise in optimization. Engineers use advanced software to nest the parts on the strip as tightly as possible. This maximizes the number of parts that can be produced from a single coil of material. This efficiency significantly reduces the amount of scrap metal generated, which lowers the overall material cost.
Comparison with Other Stamping Methods
Progressive die stamping is not the only method for mass-producing stamped parts. Understanding how it compares to other processes helps to clarify its specific advantages.
Progressive Die vs. Transfer Die Stamping
Transfer die stamping is another method for high-volume production. In this process, the part is cut out from the metal strip (blanked) at the very first station. The individual, untethered part is then moved from one station to the next by a mechanical "transfer" system of arms or fingers. This method is typically used for larger parts, like automotive body panels, that cannot be easily supported by a carrier strip.
Progressive Die vs. Compound Die Stamping
A compound die is a simpler type of tool. It performs several cutting operations, such as blanking a part's outer profile and punching its internal holes, in a single station and a single stroke of the press. It is very fast and accurate. However, it is generally limited to producing simpler, mostly flat parts like washers and shims. It cannot perform the bending and forming operations that a progressive die can.
Design for Manufacturability (DFM) for Progressive Stamping
To take full advantage of the progressive stamping process, parts must be designed with the process in mind. Consulting with an expert toolmaker early in the design phase is a critical best practice.
How Should You Design Parts for This Process?
- Incorporate Piloting Features: A good design will incorporate holes or features that can be used by the "pilots" in the die. Pilots are pins that engage with the carrier strip at each stroke to ensure its perfect alignment.
- Consider Material Grain Direction: Sheet metal has a grain direction from the rolling process. Bending parallel to the grain can cause cracking. A good design orients critical bends perpendicular to the grain. The strip layout must be planned to accommodate this.
- Optimize for the Carrier Strip: The part must be designed so that it can be securely held in the carrier strip until the final station. This may involve adding small tabs that are later trimmed off.
- Consult the Toolmaker Early: The design of the part and the design of the progressive die are deeply intertwined. A small change to the part design can have a huge impact on the complexity and cost of the tool. Early collaboration is key.
Many of the core principles still apply, such as those in our general Sheet Metal Design Guidelines. Proper design is also key to maintaining tight tolerances and avoiding issues that require a Tolerance Stack-Up Analysis. The final surface quality is also a consideration. Unlike other processes, Sheet Metal Finishing Options like coining can be integrated directly into the die to create a smooth, work-hardened surface.
Conclusion
Progressive die stamping is an unparalleled technology for the mass production of small to medium-sized complex metal parts. Its incredible speed, high repeatability, and extremely low per-part cost make it the backbone of numerous major industries. While the upfront investment in the precision tooling is significant, the long-term return on that investment is immense for any high-volume product.
The process is a perfect synthesis of design and execution. It requires expert engineering to design the tool and the part in harmony. It also requires a significant investment in high-speed, high-precision press equipment to run it effectively. At GD-Prototyping, we possess the deep expertise in both the design and operation of progressive stamping tools to deliver millions of identical, high-quality parts to our clients.